
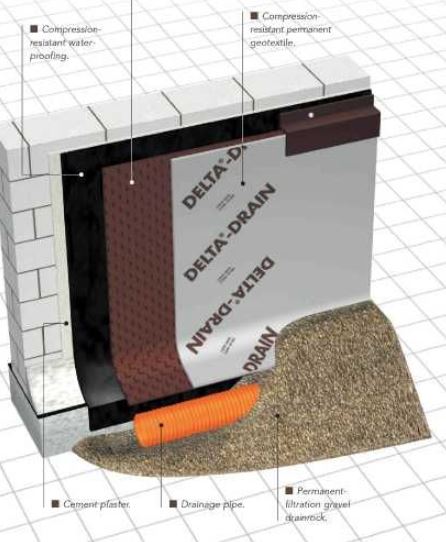
With the forms fully stripped and piled nicely ready for pick up, you are now ready to have the damproofing sprayed onto the foundation. Ensure that all the ties have been snapped off and there is good access to the entire perimeter of the foundation.
Its best to try and have the framer stack all of the outside forms away from the foundation so the damproofing contractor can spray at one time. He will need minimum 18″ clear in order to perform his work. You will also need to give him instruction on to the finished grades, in order to accurately cover the correct areas. The qualified contractor will also tar over all the snap ties and any small voids in the concrete, if there is large voids this must be parged before applying the damproofing.
Once complete the same contractor can now apply the delta drain, this product goes on after the damproofing and provides a secondary barrier against water ingress through the foundation walls. If water does penetrate the drain there are channels for the water to flow between the damproofed foundation wall and the delta drain. They will install it straight and level and place a cap strip at the top which should be tight against the foundation wall. It is installed in all areas where the foundation meets living space on the inside, it is not needed around sunken entries etc. One area of frequent problems is around the window wells, as these are usually built after the delta drain is first installed. Its best to get your contractor back to repair the corners of the wells once they have been stripped, the corner where the well meets the foundation is the specific area of concern. At the same time the contractor repairs the corners he can apply damproofing to the outside of the well ( it is not neccesary to apply delta drain to this portion as it is not against living space). When all is complete your contractor will give you a letter that all has been properly done and this will be need to be turned into the inspector during inspection.


Leave A Comment